Most “forex education” content explains concepts—pip values, support and resistance, risk management—but skips the part that intimidates beginners most: the actual click-by-click process of turning an idea into a real trade, managing it while it’s open, and closing it cleanly.
So in this post, I’m going to walk through a single trade from start to finish. Not in a “perfect hindsight” way—more like how it happens in real life: you choose a pair, decide what you’re trying to capture, pick an order type, place the trade with a stop-loss and take-profit, watch execution details, manage the position, then close it (or let it close).
I’ll include a full forex trade example with numbers so you can see the mechanics behind the scenes.
The trading “assembly line” (what we’re demystifying)
A forex trade has a surprisingly consistent anatomy:
- Select a currency pair
- Choose direction (buy/long or sell/short)
- Choose an order type (market, limit, stop, stop-limit, etc.)
- Decide position size
- Set risk controls (stop-loss) and objective (take-profit)
- Place the order
- Order execution happens (fills, slippage, spread)
- Manage or adjust (optional)
- Close the position (manual close or TP/SL hit)
- Review the outcome (what actually happened vs. what you expected)
That’s it. Everything else—strategy, indicators, news—is input into those steps.
Step 1: Choosing a pair (and why it matters operationally)
For our forex trade example, I’ll use EUR/USD because it’s liquid, spreads are typically tight, and execution is usually clean.
When you pick a pair, you’re indirectly choosing:
- Typical spread (your “cost to enter”)
- Volatility (how fast it moves; affects stop placement)
- Trading session behavior (EUR/USD tends to move most during London/NY overlap)
- News sensitivity (e.g., U.S. CPI can move EUR/USD sharply)
My practical rule (from experience): If you’re learning how to place a forex trade, start with one major pair. Fewer variables, cleaner fills, fewer “why did that happen?” moments.
Step 2: Decide the trade idea in one sentence
A trade idea should be expressible as a single sentence you can defend.
Example idea:
“EUR/USD is in an intraday uptrend; I want to buy a pullback and target the prior swing high.”
That sentence tells you:
- Direction: Buy
- Timing preference: On a pullback
- Logical target: Prior high
Step 3: Pick the right order type (the moment most people get stuck)
This is where forex order types matter. Your order type is basically your entry behavior.
Here are the core ones you’ll actually use:
Market order
- What it does: Enters immediately at the best available price.
- When to use: You want in now; you accept spread/slippage risk.
- Beginner pitfall: Entering at market during fast news spikes.
Limit order
- What it does: Enters at a better price than current (buy lower / sell higher).
- When to use: Pullback entries, mean reversion, planned levels.
- Pitfall: Price may never come back → you miss the trade.
Stop order (entry stop)
- What it does: Enters once price breaks a level (buy higher / sell lower).
- When to use: Breakouts, momentum continuation.
- Pitfall: False breakouts and slippage.
Stop-limit (less common for many retail platforms)
- What it does: Triggers at a stop price but fills only up to a limit price.
- When to use: You want breakout entry but with slippage control.
- Trade-off: You might not get filled.
For our idea (“buy a pullback”), a buy limit is the most natural fit.
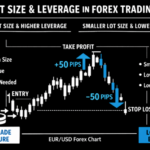
Step 4: Define your entry, stop-loss, and take-profit (before sizing)
Let’s assign realistic numbers.
Assume:
- EUR/USD current price: 1.0850
- You want to buy a pullback near a support area: 1.0830
- You define “I’m wrong” below the recent swing low: 1.0815
- You target the prior swing high: 1.0875
So:
- Entry (Buy Limit): 1.0830
- Stop-Loss: 1.0815
- Take-Profit: 1.0875
Now compute the distances:
- Risk (Entry → Stop): 1.0830 − 1.0815 = 0.0015 = 15 pips
- Reward (Entry → TP): 1.0875 − 1.0830 = 0.0045 = 45 pips
- Risk:Reward = 1:3
That’s not “magic,” but it’s structurally clean: small invalidation, meaningful target.
Personal note: Early in my trading, I used to pick targets based on hope (“maybe it runs!”). The biggest improvement I ever made was forcing myself to choose a target that exists on the chart (prior high/low, range boundary, measured move). It made trade management less emotional.
Step 5: Choose position size (so the stop-loss means something)
This is the step that turns a stop-loss from a decorative line into actual risk control.
Let’s say your account is $5,000 and you risk 1% per trade:
- 1% of $5,000 = $50 risk
If your stop is 15 pips, then you need a position size where 15 pips ≈ $50.
For EUR/USD, pip value depends on lot size, but approximately:
- 1.00 lot (100,000 units) ≈ $10/pip
- 0.10 lot ≈ $1/pip
- 0.01 lot ≈ $0.10/pip
To risk about $50 with a 15-pip stop:
- Desired $/pip = $50 ÷ 15 ≈ $3.33/pip
- That’s roughly 0.33 lots (since 1 lot ≈ $10/pip)
So your size might be 0.33 lots (or whatever your platform allows, e.g., 0.32 or 0.34).
This is the core of how to place a forex trade responsibly:
You don’t pick size first; you pick stop placement first, then size to match risk.
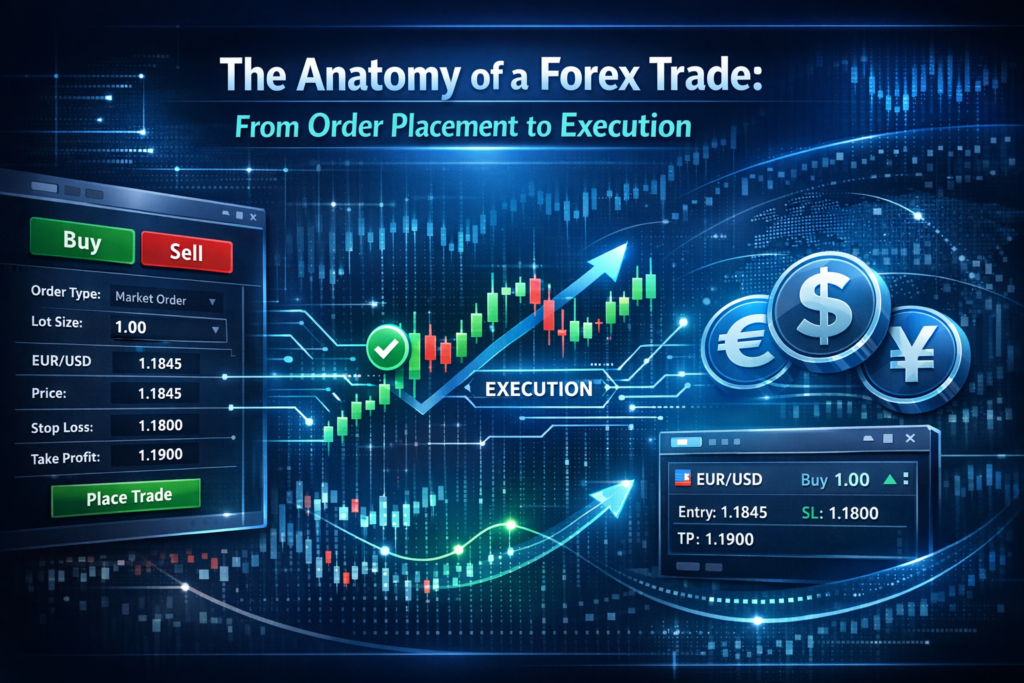
Step 6: Place the order (what you actually enter on the ticket)
On a typical trading platform, your order ticket will ask for:
- Symbol: EUR/USD
- Volume/Lot size: 0.33
- Order type: Pending order → Buy Limit
- Price: 1.0830
- Stop Loss: 1.0815
- Take Profit: 1.0875
- Time in force: GTC (Good ’Til Cancelled) or Day
- (Optional) Comment/Tag: “Pullback long – prior high target”
Before you click “Place,” do a final “mechanical sanity check”:
- Is the stop on the correct side? (For a buy, stop should be below entry.)
- Is the take-profit on the correct side? (For a buy, TP should be above entry.)
- Does the lot size match your intended risk?
- Are you placing a limit and not accidentally a stop?
I still do this check every time. It takes 5 seconds and prevents the dumbest errors.
Step 7: Execution (what happens when price hits your level)
When EUR/USD trades down to 1.0830, your buy limit becomes eligible to fill.
Here’s what “execution” actually means in practice:
1) The spread is always in the background
- Buys fill on the ask
- Sells fill on the bid
So if your platform shows 1.0830/1.0831, and your buy limit is 1.0830, you may need price action that brings the ask to your level.
2) You can get partial fills (less common in major FX, but possible)
In very liquid pairs, retail traders usually get filled in one shot. But during volatility, you might see:
- Partial fill
- Requote (some brokers)
- Slippage
3) Slippage can help or hurt
- Positive slippage: you get a slightly better price
- Negative slippage: you get a slightly worse price
Let’s say you intended 1.0830, but got filled at 1.0831 due to a brief uptick in spread.
Now your stop at 1.0815 is 16 pips away instead of 15. That slightly increases risk unless your broker adjusts sizing or you adjust manually.
This is why execution matters: it changes the actual math, even when your plan was perfect.
Step 8: Your position is live (what you should watch—and what you shouldn’t)
Once filled, you now have:
- Entry: ~1.0831
- SL: 1.0815
- TP: 1.0875
At this moment, beginners often sabotage themselves by watching every tick and “doing something” because they feel they should.
Operationally, there are only a few reasons to intervene:
Legit reasons to adjust
- Your trade thesis changed (support broke structurally, news changed regime)
- You made an input error (wrong SL/TP, wrong size)
- You’re actively managing with a documented rule (e.g., move stop to break-even at +1R)
Not-great reasons (common)
- Price is moving against you a little
- You’re bored
- You want to reduce anxiety by tinkering
Personal note: The hardest part of trading for me wasn’t entries—it was learning to let the trade either work or not work without constantly “touching the stove.” A stop-loss is already a decision you made calmly. Respect it unless your reason changes.
Step 9: Closing the position (three clean endings)
Every trade ends in one of these ways:
A) Take-profit is hit (automatic close)
Price reaches 1.0875, your position closes, profit is realized.
Approx profit estimate:
- 1.0875 − 1.0831 ≈ 44 pips
- At ~$3.30/pip, profit ≈ $145 (ballpark)
B) Stop-loss is hit (automatic close)
Price reaches 1.0815, position closes, loss realized.
Loss estimate:
- 1.0831 − 1.0815 = 16 pips
- 16 × $3.30 ≈ $53
C) You close manually (discretionary exit)
This can be:
- You take profit early (e.g., near resistance)
- You cut loss early (thesis invalidated before SL)
- You exit due to time (end of session/week)
Mechanically, manual close is usually:
- Click “Close position”
- Choose full or partial close
- Confirm
Pro tip: If you ever do partial closes, write down the rule. Otherwise, it turns into random behavior that’s hard to evaluate later.
Step 10: Post-trade review (the part that actually improves you)
After the close, capture the data that helps you get better at the process:
- Pair, direction, session
- Screenshot at entry and exit
- Order type used (market/limit/stop)
- Planned entry/SL/TP vs. actual fill
- Result in R (e.g., +2.9R, -1R)
- One sentence: “What did I do well? What would I repeat/change?”
This is where “demystifying trading” becomes real. You stop thinking of outcomes as luck and start seeing process.
A quick recap: the full forex trade example in one block
- Pair: EUR/USD
- Bias: Buy pullback in uptrend
- Order type: Buy Limit
- Entry: 1.0830 (filled 1.0831)
- Stop-loss: 1.0815 (≈16 pips risk after slippage)
- Take-profit: 1.0875 (≈44 pips reward)
- Position size: ~0.33 lots (risk ≈ $50)
- Exit: Either TP, SL, or manual close per rule
That’s the “anatomy”—from idea to execution to closure.
Common mistakes when learning how to place a forex trade (and how to avoid them)
- Choosing the order type last
Decide how you want to enter (now, on pullback, on breakout) before touching the ticket. - Setting stop-loss based on money, not structure
Stops should be placed where your thesis is wrong, then size adjusts to match risk. - Ignoring execution details (spread/slippage)
Your plan uses perfect numbers; real fills don’t. Track the difference. - Moving the stop-loss “just this once”
That turns a controlled loss into an uncontrolled one. - No defined close behavior
If your only plan is “I’ll close when it feels right,” you’ll find out feelings are expensive.